Million Pollinator Garden Challenge

We are in the midst of National Pollinator Week (June 15–21)! An unprecedented group of twenty-four conservation and gardening organizations has formed the National Pollinator Garden Network and, with First Lady Michelle Obama, launched the Million Pollinator Garden Challenge.

MPGC-FINAL-315x315

The Network challenges the nation’s gardeners to create one million additional pollinator gardens by the end of 2016.

This campaign encourages home gardeners to help reverse the decline of honeybees and native bees, butterflies, hummingbirds and other pollinators. This extraordinary initiative underlines the importance of pollinators to our food supply and invites home gardeners to take effective personal action even as the nation’s Pollinator Task Force mobilizes more than fifteen federal agencies to improve pollinator health.

In a recent column, we urged keeping your garden free of synthetic chemical pesticides and herbicides, and using less-toxic alternatives. The Pollinator Partnership (www.pollinator.org), a member of the new Network, offers specific advice:

  1. Plant for Pollinators (the website includes a link to a cellphone app that lists 1,000 pollinator friendly plants native to the United States)
  2. Reduce or eliminate the impact of pesticides.
  3. Register as a SHARE site (see more about this below)
  4. Reach out to others – inform and inspire
  5. Buy local and organic produce, including honey
  6. Conserve all of our resources; use less and reduce your impact.
  7. Support the work of groups promoting science based, practical efforts for pollinators

The Network concurs with these recommendations, as expected, and adds these complementary ideas:

  1. Provide a water source
  2. Situate your garden and/or plants in a sunny area with wind breaks
  3. Create large “pollinator targets” of native or non-invasive plants
  4. Establish continuous blooms throughout the growing season

Once you establish your pollinator habitat garden, visit share.pollinator.org/ to register your garden on the Pollinator Partnership’s SHARE site. Adding your garden to the site’s map of the United States gives you personal bragging rights as a friend to pollinators and supports the effort to encourage others to participate in the Million Pollinator Garden Challenge.

The website for the Challenge (http://millionpollinatorgardens.org/) provides links to each of its members, and most (or all) of these groups identify pollinator-friendly plants.

Still, because gardening is specific to location, Monterey Bay area gardeners should focus on plants to native to the local region. To find such plants, visit these websites:

California Native Plant Society 

Las Pilates Nursery

Xerces Society

Join the Million Pollinator Garden Challenge. The bees and other pollinators will thank you, and your garden will be richer for the effort.

Garden Plants on the Move (Moving Trees & Shrubs)

Autumn in the garden is a good time to prepare for relocating shrubs or trees that would look or grow better in a different location.

If the thought of moving a shrub or tree troubles you, recognize that even good plants need not be permanent. Here are some reasons for moving a healthy shrub or tree.

  • The tree or shrub has grown so large it’s crowding a walkway or other plants.
  • Other nearby plants have grown so large that they are shading a plant that needs sun.
  • Other nearby plants are now gone, exposing a plant that needs shade.
  • The tree or shrub is needed elsewhere in the landscape.
  • The gardener wishes to install a new feature, and the tree or shrub is in the way.
  • The gardener has wishes to establish a thematic plant bed where an off-theme tree or shrub is growing.

When preparing to relocate a plant, first decide on where it will go. Examine the new location to ensure that it is the right place for this particular plant. Confirm that the soil is suitable, the drainage is good, and the exposure it right for the plant. Finally, make certain that the new spot could accommodate the plant when it is fully grown. Then, dig a hole twice the width of the intended root ball.

Ideally, prune the roots to protect against transplant shock. This involves digging a trench around the plant, outside the intended root ball, refilling the trench and watering to settle the soil. Root-prune in March for plants to be moved in October, and in October for plants to be moved in March.

Then, plan how to move the plant, taking its size into consideration.

Small Shrubs and Trees

For a shrub less than three feet tall, or a tree with a trunk is less than one inch wide, you could move it bareroot, i.e., without digging up a root ball. To move such a smaller plant bareroot, dig a trench around it, cutting the longer roots, wash the soil off the lateral roots, and use a flat shovel to remove the soil under the plant. Keep the roots moist until you are ready to transplant.

Not-so-small Shrubs and Trees

If you are preparing to move a plant that is between three and five feet high, decide how large a root ball to provide. For industry standards for transplanting different plants of various sizes, visit the website, americanhort.org and search for “root ball.” For example, moving a five-foot tree or shrub requires an eighteen-inch wide root ball. A root ball of that size could weigh 250 pounds, so plan for the appropriate equipment and helpers.

Larger Shrubs and Trees

Most gardeners will hire a tree service to move a tree or shrub that is larger than five feet high. If you prefer to do such work yourself, I will say “best wishes,” and predict that you will have professionals do your next transplant.

Really Large Trees

Even very large trees—up to forty-five feet high—can be moved successfully, if not cheaply. The widely available tree spade uses an array of large shovels to dig a conical divot to pluck a plant from the ground, and deposit it in a matching hole. For video clips of tree spades in various sizes, browse to YouTube.com and search for “tree spade.” To see an interesting DIY device, search YouTube for “Tree Toad 24 inch Tree Transplanter.”

Tree Spade

A mechanized tree spade makes transplanting large bushes and small or medium trees a much easier proposition. Photo: Dutchman Industries


A newer technology for moving larger plants is the “air tool,” which uses compressed air to blow soil away from a tree’s roots. This bareroot method avoids pruning or breaking the roots, so the plant experiences little trauma and quickly resumes its usual growth cycle. To see a brief video demo of the air tool, visit growingwisdom.com, click on “Trees & Shrubs” and scroll to the link, “How to Move Large Trees Using an Air Tool.”

After moving a tree or shrub, transplanting herbaceous perennials is easy!

Gopher Overview

Most of these columns are on current priorities in my own garden. The premise of course is that many gardeners could be dealing with the same issues at any given time.

Recently, when we listened to those people who always seem to know what’s going at, we learned that 2012 is a big year for gophers.

In the past, I have relied on two visiting cats to keep my garden gopher-free. (I don’t know where else they get their food, so they probably are feral felines.) The result of their advancing age plus a peak in the local gopher birth rate is a record number of gopher mounds.

It might be possible to avoid gopher problems entirely by limiting the garden to plants that gophers do not enjoy. This approach limits the gardening experience severely and still might not succeed: hungry gophers don’t always follow the rules.

The first step toward “control” (the polite term) is to confirm that you have gophers, rather than relatively harmless moles. Gophers are herbivores; moles are omnivores, but mostly eat earthworms and insects. Gopher mounds are crescent or horseshoe shaped when viewed from above. The hole, off to one side of the mound, usually is plugged. Mole mounds are more circular and volcano-shaped when viewed from the side.

One gopher can create and abandon several mounds in day, so the gardener’s challenge is to find the gopher’s main burrow, which will be six-to-twelve inches deep and connected to a mound. When you see a fresh-looking mound, poke around with a stick or metal probe until you feel a drop of about two inches, indicating that the probe has entered the burrow. This might be the main burrow, where you should set your traps.

Use a shovel to expose the burrow enough to set your traps. The popular Cinch Trap, available at most garden centers, comes in small, medium and large sizes. Use the size that fits snugly in the burrow you found. Set two traps according to instructions (watch your fingers!) and place them in opposite directions in the burrow, to trap the gopher coming from either direction.

Baiting the traps is optional. Fruits, vegetables or peanut butter are good choices. You could also use toxic baits, but that is personal choice and probably not ecologically wise.

Connect the traps to stakes with baling wire or light chain, for easy removal. Cover the excavation with dirt clods, wood, cardboard or anything else to exclude light.

Check the traps regularly and reset them as needed. If you haven’t caught a gopher in three days, try a different location.

Benjamin Franklin probably wasn’t thinking about garden pests when he said, “Energy and persistence conquer all things,” but that’s good advice for gopher hunters.

Mulch for Much Easier Gardening

Mulching represents a gardener’s not-so-secret strategy for achieving the universal objective: a low-maintenance garden.

If your garden is time-consuming, frustrating and disappointing, it probably needs mulching.

Several other possible causes should be considered: nutrient-poor soil, lack of irrigation, inappropriate plant selection, etc., but let’s focus for the moment on mulching.

A three-inch deep layer of an organic mulch between plants discourages weed growth, conserves water and, in time, breaks down to add nutrients and texture to garden soil.

We should not ignore the downsides of mulching. For example, a larger garden will require several cubic yards of organic mulch, leading to significant charges from a landscape supply company for the material and its delivery. In addition, distributing the mulch within the garden, while not difficult, consumes time and energy.

One more downside: organic mulches decompose in time, so the time and expense will have to be incurred again. Finer mulch materials break down faster than coarse materials.

Some organic mulch is free, e.g., disease-free wood chips that tree services will dump on your property, upon request (to avoid landfill charges), or seaweed harvested during low tide. Wood chips might be regarded as less attractive than finer mulches, and seaweed, although excellent in nutrient content, often is troublesome to gather, buddy and smelly.

A landscape supply company will offer a variety of organic mulches in bulk, e.g., redwood sawdust, shredded cedar, fir bark and gorilla hair (shredded redwood bark, really), in a range of sizes and prices.

Another option is cocoa shell mulch, which is available in bags of two cubic feet for about $5.00. This material looks good, emits a nice fragrance and breaks down slowly, but contains theobromine, a natural compound that if eaten is highly toxic to dogs and cats.

The gardener could consider each of the available options, and perhaps try a sample bag in the garden.

Home supply stores offer organic mulches in bags of two cubic feet of material. These can be appropriate for smaller beds, but for larger projects will be more expensive than bulk materials. To move one or two yards of mulch, it’s good to have a friend with a pickup truck.

Gravel mulch might be preferred for a rock garden or succulent garden. For a rock garden in particular, gravel mulch simulates scree, the debris of broken rock seen on mountain slopes.

Like organic mulches, gravel mulch discourages weeds, conserves moisture and looks better than bare soil.  Gravel is much more expensive per cubic yard than organic mulches, but a one-inch layer should be enough and gravel doesn’t decompose. Gravel mulch is difficult to remove, so for practical purposes treat the installation as permanent.

Enjoy your mulched garden.

More

Estimating Mulch Needs

To decide how much material you will need, estimate the surface area of the garden bed(s) to be mulched: length times width (in feet). Multiple by the intended depth of the mulch layer: for a three-inch layer, multiply by .25. Finally, convert cubic feet to cubic yards by dividing by 27.

Example: a 12 feet x 18 feet garden bed has a surface area of 216 square feet. For a three-inch layer of mulch, .25 x 216 yields 54 cubic feet. Divide by 27 to determine a need for two yards of mulch.

Seaweed Mulch

An interesting article, How to Use Seaweed to Mulch Your Garden, is available on the website for Eartheasy: Solutions for Sustainable Living. Gardeners who live close to the beach might wish to try this mulch material, but it seems too smelly and buggy for my taste. It also decomposes into slime rather quickly.


Pruning Lavender

Pruning chores can frustrate gardeners when they are unsure of their knowledge. While they might understand that pruning improves the plant somehow, after they have devoted time and energy to growing the plant, trimming the plant’s growth might seem counter-productive.

Pruning the lavender plant puzzles many gardeners, so let us take a look at best practices.

We prune lavenders to stimulate new green growth, which produces flowers, and to slow the formation of older woody growth, which does not produce flowers. Traditionally, we prune lavenders to compact mounding forms that look attractive and yield maximum blooms.

There are two good times of the year to prune lavender plants: in the early spring, before they begin seasonal growth, and in the late summer, after their bloom period. Fall begins on September 22nd, so now is pruning time.

Here is a way to confirm that your lavender is ready to prune. Take a break in the garden, sit quietly near your lavender plant(s) and watch the bees. If they flit from blossom to blossom without lingering to feed, you will know that the blooms are finished for the year and it is pruning time.

Pruning shears will do the job, but use hedge shears to make quick work of pruning. When pruning several lavender plants, an electric hedge trimmer will be the tool of choice.

In any case, ensure that the pruning tool is sharp enough for clean cuts, and wipe it down between plants with rubbing alcohol or bleach to remove any harmful bacteria or germs.

When pruning, remove about one-third of the green growth to stimulate new growth. Do not cut into the woody stems: they will not produce new green growth and cutting too deeply could kill the plant.

If you have the time and patience for precision pruning, cut just above the third node above the woody part of the stem. Most gardeners will keep this rule of thumb in mind without actually counting nodes on each stem.

This process should be repeated in the early spring.

Start this twice-yearly pruning schedule when the plant is still young, i.e., the second year after putting a new plant in the ground. This delay allows time for the plant to establish its roots.

Gardeners might encounter a lavender plant that has not been pruned routinely for three years or more and has become rangy and unattractive, with long woody stems and minimal blossoms. Sadly, the plant cannot then be pruned to rediscover the preferred tight mound form, and should be replaced.

With these guidelines, the gardener will find pruning lavenders quick and easy, and finish the task with a nice fragrance from the lavender’s aromatic oils.

Enjoy your lavender!

More.

There are minor differences in pruning recommendations for the various species of lavender. For this reason, the gardener should be aware of the particular species that is to be pruned.

The most popular species of lavender for residential gardening are English Lavender (Lavandula angustifolia), French Lavender (L. dentata)  and Spanish Lavender (L. stoechas).  Another form that may be seen is Lavandin or Hedge Lavender (L. x Intermedia), which is a cross (hybrid) of English Lavender and Spike Lavender (L. latifolia).

English Lavender’s flower petals unfurl along much of the length of its long stocks. Its green, narrow leaves largely lack the silver and gray cast of the other varieties. It is available in several cultivars. Sunset’s Western Garden Book lists the following: Alba, Blue Cushion, Buena Vista, Compacta, Hidcote, Jean Davis, Lady, Martha Roderick, Melissa, Munstead, Rosea, and Thumbelina Leigh. A light pruning after early-summer flowering often will promote reblooming later in the summer. In late summer, cut back to one-third or even one-half of stem length, as outlined above.

French Lavender has looser-looking, light purple flowers. Their grayish leaves appear more serrated (or dented) than those of their Spanish cousin (the specific name dentata means “toothed”). Prune after flowering remove about one-third of stem length.

Spanish Lavender has tight, deep purple blooms that are shaped like pine cones. Four petals reach skyward, distinctly shaped like rabbit ears. The flower spikes are highly compressed and surmounted by showy, large, sterile bracts. Some varieties have white flowers. The bushes grow about 18 inches tall, with silvery-green leaves. Cultivars include Hazel, Kew Red, Otto Quast, Willow Vale, Wings of Night and Winter Bee.

Hedge Lavender cultivars are Abrialii, Dutch, Fred Boutin, Grosso, Provence, Silver Edge, White Spikes, and others.


Landscaping with Succulents

The many gardeners who appreciate succulent plants will have two informative events—with plant-buying opportunities—in September, so this is a good time to plan ahead.

Let’s start with two information fragments, for the record:

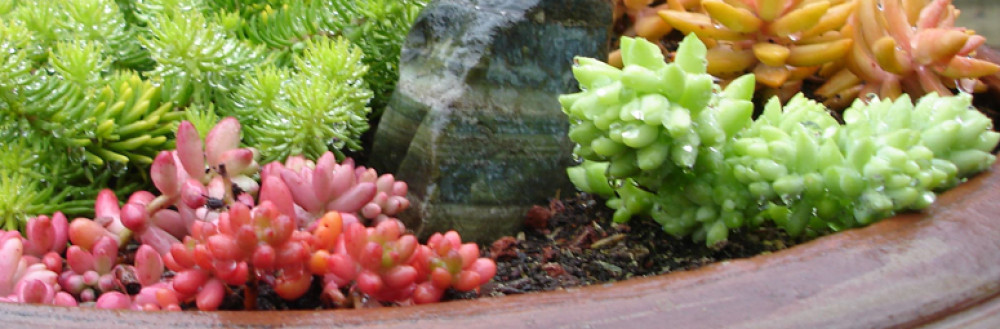
  • all cactuses are succulents, but all succulents are not cactuses, and
  • succulents, found in many different botanical families, are simply plants that store moisture.

The first event will be the Annual Show and Sale of the Monterey Bay Cactus and Succulent Society. This occasion will be in the large patio of Jardines Restaurant, 115 Third Street, San Juan Batista. It happens from 9:00 to 5:00, Saturday, September 15th and (9:00 to 4:00, Sunday September 16th. Hint: make a luncheon reservation when you first arrive.

The second event, on Friday, September 28th and Saturday, September 29th, will be the Second Annual Succulent Extravaganza!,at Succulent Gardens: The Growing Grounds. This sprawling nursery for succulent plants is at 2133 Elkhorn Road, Castroville (near Moss Landing; check it out on Mapquest or Google Maps). The schedule will be 9:00 to 4:00 on both days, plus a BBQ from 4:00 to 6:00 on Friday. The schedule of speakers will be posted soon at sgplants.com.

When gardeners see the vast arrays of succulent plants at these events, they might experience the immediate reaction, “What fascinating/beautiful/striking plants!” and the slightly delayed reaction, “How could I use these plants in my garden?”

The aesthetic reaction could happen repeatedly while viewing a large display: succulents take many forms, size and colors, and are particularly striking when in bloom. This response involves the gardener’s own idea of attractiveness, so we will leave it to the individual.

The planning reaction relates to both the gardener’s personal preferences and his or her unique environment for new succulent plants. For these reasons, landscape design must be an ongoing local project, but still there are a few principles to consider.

There are two major categories of landscaping with succulents: succulents alone and succulents with companion plants (also known as “mixed beds”). We could identify countless additional categories of landscaping with succulents, including container gardening with succulents, but let’s start with these two.

There are many books and websites that provide detailed information on succulent plants, but very few that offer insights into landscaping with succulents. One book that does this very well is Dry Climate Gardening with Succulents (1995) by Debra Brown Folsom, with John Trager, James Folsom, Joe Clements, and Nancy Scott. The authors, all connected with the world-class Desert Garden at The Huntington Botanical Gardens, consulted with experts from six other gardens to produce this exceptional reference. Look for it today in your public library and on Amazon.com.

Enjoy September’s two big succulent events.

More

“Succulent-only” Landscape Designs

The design of a landscape—or a garden bed—limited to succulents still involves basic decisions before the selection of individual plants.

One option would be limit to the bed to a single species. A mass effect can bring interest to the landscape, particularly when the bed is a feature within the larger picture. Having multiple specimens of a single species focuses the viewer on the details of the plant.

In some gardens, we see beds devoted to essentially random groupings of succulents, with no apparent relationship to one another. There are succulent plants in 60 different plant families, divided into 300 genera that include many succulent species. Visit the website of The Succulent Plant Page for more information on this point.

This “succulent universe” presents a very large number of possible combinations of plants, suggesting that a thematic approach of almost any description would elevate the design from hodgepodge to something more comprehensible to the viewer.

Variations of the “succulents only” design include a collection of plants within a genus, from a geographic region, or from a selected plant community. Each of these variations provides a degree of satisfying coherence to the design.

Additional thematic possibilities for such a design might emphasize combination of form, blossom color or foliage color.

Landscape Designs that Combine Succulents and Companions

According to the authors of Dry Climate Gardening with Succulents, the designer’s objectives for combining succulents with non-succulents might include providing contrast, counterpoint and accents, bringing out the best in both the succulents and the companion plants, or providing interest during periods when the succulents are not in bloom.

In any event, the designer’s first consideration should be to ensure that the companion plants have cultural requirements that are compatible with the succulent plants. Generally, this means bright light, minimal water with good drainage, good air circulation and balanced fertilizer during the growing season. These requirements orient the designer to the selection of xerophytic shrubs, i.e., plants that are adapted to a dry habitat.

This consideration leads the designer away from lush tropical plants, because they have different cultural needs and simply don’t look natural together with succulents. While it is always possible for a creative designer to find interest in unlikely combinations, most will do well by separating succulents and tropicals.

A large number of drought-tolerant plants are suitable as companion plants in a succulent garden. Indeed,there are many succulents that grow well with less than full exposure to the sun, so the number of drought-tolerant plants that thrive with partial exposure to sunlight could be added to this list.

The best companion plants for succulent gardens, however, are desert shrubs and trees. They have very similar cultural requirements, many similar physical characteristics, and in some cases different physical characteristics that provide a welcome counterpoint to the succulents. As an example of a desirable difference, Dry Climate Gardening with Succulents offers the Baja Fairy Duster (Calliandra californica), an evergreen Mexican shrub with brilliant red feathery blooms. This book recommends many more non-succulent plants for the succulent garden.

Ultimately, aesthetic considerations should guide the designer in the selection of companion plants for succulents. When possible, bring a candidate plant to the succulent bed in a pot to assess how it would look when planted. As always, this will be the individual gardener’s decision.

Landscaping with succulents, with or without non-succulent companion plants, offers the garden designer an intriguing list of challenges and opportunities. Enjoy your garden!


Paths to Garden Success

One of my projects during this past week was to install a maintenance path through a deep garden bed, to provide access for weeding, deadheading, organic spraying, irrigation maintenance, and whatever else.

(By the way, my recent call for alternatives to the term “deadheading” yielded an intriguing suggestion: “bloom boosting.” That term is more descriptive than my relatively technical term of “rejuvenation,” and the best one I’ve received. It could catch on!)

A very deep bed should have a maintenance path every four feet, which effectively divides the larger area into beds that are four feet wide and accessible from both sides. That maximum width enables the gardener to reach all parts of the bed without stepping into the bed and compressing the soil.

To avoid fragmenting the appearance of a deep bed, the gardener could form maintenance paths with twelve-inch (round or square) concrete pavers. These are available for as little as ninety-nine cents each, and, when placed behind taller plants, can be unobtrusive.

Maintenance paths could be simply unplanted areas, to be sure, but unpaved pathways could become overgrown and difficult to find. The use of pavers or natural flagstones avoids such problems.

The creative gardener could cast unique (or semi-unique) pavers using purchased or homemade molds. That might satisfy a creative urge, but seems like overkill for something intended to be invisible to visitors.

Pavers also could be used for a walkway for gardeners and their visitors. Such walkways should be at least four feet wide, so the casual visitor could stroll through the garden without watching every step. In larger gardens, wider paths might be well proportioned and would accommodate side-by-side strollers.

There are many possibilities for the surface of a garden path, too many to review here. My paths are not constructed with paver, but with three or four inches of decomposed granite (“DG”) on landscape fabric, with Sonoma fieldstone rocks as edging. This design can be achieved at low cost per foot, but weed seeds, delivered by the wind and the birds, will germinate in the DG. Regular applications of corn gluten, an organic pre-emergent herbicide, can reduce the continuing need to weed the walk.

This use of DG (a coarse sand) resembles a path material called hoggin, which is a mix of gravel, sand and clay that binds firmly when compacted, yet allows water to drain through it. A hoggin pathway (more popular in the United Kingdom than in America) looks attractive and is easy to maintain, just requiring occasional weeding.

Well-designed and well-constructed pathways support both the maintenance and enjoyment of the garden. Planning and building a good path will add greatly to the long-term success of the garden.

More

For a good selection of garden path designs, see “35 Lovely Pathways for a Well-Organized Home and Garden.”

The Web has lots of technical information and video clips on building a garden path, including the selection of materials and the actual construction. Search the web for “design a garden path” or “build a garden path.”

We focus here on the route for a garden path.

When planning the route of a new path, consider both its function and its aesthetics.

The path’s basic function is to support comfortable, efficient and safe movement around the garden, by both the gardener and visitors. The path should connect the garden’s entrance and its exit, and provide good access to the principal features of the garden, e.g., patio, seating area, tool shed, garden art, greenhouse, pond, compost bin, nursery, irrigation controls, etc.

Safety considerations include the following

  • running grade no greater than 4%, i.e., elevation changes no more than one foot for each twenty-five feet, or about one-half inch per foot. (Use steps for greater slopes);
  • cross-slope no greater than 2%, for pedestrian comfort and safe use of wheelchairs;
  • ramps should not exceed 15% (8% for wheelchair use); and
  • surfaces should provide good traction under wet, snow or frost conditions, and should be kept reasonably clean of organic materials, e.g., leaves.

Aesthetic considerations are more subjective.

The appearance of the pathway, determined by the materials used, should relate well to the style of the garden. For example, a pathway of concrete, clay or natural stone pavers will be best in a formal garden environment, while a pathway of sand, gravel or hoggin will look “right” in an informal garden. A pathway of poured concrete would be most appropriate in a public botanical garden or arboretum, where high levels of use by pedestrians, shuttles and maintenance vehicles would be anticipated.

The aesthetics of pathway design also includes subtle issues. Generally, avoid straight-line pathways and right angles, both of which suggest formality and seem incompatible with the experience of strolling through a garden.

Then, ensure that each part of the pathway leads to a destination, e.g., a seating area, an exit, or one of the garden’s features, as listed above. A looping segment of the pathway should be intended clearly to support viewing of all sides of a larger bed. The pathway should neither meander aimlessly or lead to a dead end that requires the visitor to retrace his or her steps.

Finally, the pathway should not expose the entire garden to the visitor’s view, but should be designed to “conceal and reveal” in a managed process. Use the curves of the pathway, in combination with larger plants, to create a series of small mysteries that entice the visitor to discover what lies just out of sight. Then, as the visitor advances along the pathway, reveal the “prize,” which could be one of the garden’s features, listed above, or a specimen plant, nicely presented.

The layout of a garden pathway that addresses both functional and aesthetic concepts successfully can be a challenging exercise, but also can add greatly to the overall success of the garden. Just about all pathway designs can be revised on the basis of experience, so the gardener should feel free to experiment.

Deciding on Dahlias

The dahlia counts among our most satisfying and popular ornamental plants. It grows easily, blooms over a long period, reproduces generously and returns anew, year after year.

Spanish explorers brought the dahlia from Mexico and Guatemala to Spain in the early 1800s, where it became popular throughout Europe. The arrival in 1872 of a new variety, Dahlia juarezii, inspired hybridizers to create the wide range of dahlias from which gardeners can choose today.

The dahlia-growing year has three phases: selecting the plants, planting the tubers, and enjoying the blossoms. The planting season begins after the last frost (after April 1st for the Monterey Bay area, conservatively) and ends mid-June (earlier is better). The Monterey Bay Dahlia Society schedules its annual sale in early April.

The bloom period begins in mid- to late-July, depending on the cultivar, and continues until frost. In this area, we can leave tubers in the ground to sprout in the spring.

The first phase of the gardener’s annual dahlia-growing plan is to select plants to add to the garden. We might indulge occasionally in impulsive gardening, but planning works!

The time to select plants is now. This may be the dahlia’s greatest challenge. The American Dahlia Society recognizes eighteen forms of the dahlia, fifteen colors or color combinations, and nine blossom size categories. In addition, for each form, hybridizers have produced —and continue to produce—many unique cultivars.

Planning for specific plants also involves choosing a suitable location, which for dahlias means full sun and good drainage. In addition, site selection should consider how the size and color of dahlias would relate to nearby plants. The gardener might visualize a “garden vignette,” a setting in which dahlias would complement other new or existing plants.

There are no compelling rules here, except the tried-and-true “tall plants in back” idea, which concerns only visibility. Many combinations of color and form can be successful, so the individual gardener’s creative and aesthetic senses are most important.

After deciding on a spot for dahlias in your garden, you will have until planting time for site preparation: removing or relocating existing plants, amending the soil, etc.

To choose which dahlias to grow in your garden, know the options. An excellent opportunity for this planning is the Monterey Bay Dahlia Society’s 2012 Annual Dahlia Show, which runs from 1:00 to 5:00 on Saturday, August 25th and from 11:00 to 4:00 on Sunday, August 26th. It will be at Soquel High School, 410 Old San Jose Rd., Soquel, CA. At this free event, local gardeners display hundreds of types of dahlias and compete for awards. Knowledgeable volunteers will offer growing tips and answer questions. Dahlia blooms and plants will be available for purchase as well.

More

The following information is from the American Dahlia Society.

Blossom Size

  • AA -(Giant), over 10 inches in diameter
  • A -(Large), over 8 to 10 inches in diameter
  • B -(Medium), over 6 to 8 inches in diameter
  • BB -(Small), over 4 to 6 inches in diameter
  • M -(Miniature), up to 4 inches in diameter
  • BA -(Ball), over 3.5 inches in diameter
  • MB -(Miniature Ball), over 2 to 3.5 inches in diameter
  • P -(Pompon), up to 2 inches in diameter
  • MS -(Mignon Single), up to 2 inches in diameter

Form

  • Formal Decorative – Ray florets (petals) are flat, partially revolute (petal edges roll back), or partially involute (petal edges roll forward). The petals are uniform and regularly arranged, tending to curve toward the stem.
  • Informal Decorative – Ray florets are twisted, or curled, or wavy creating an affect that the petals are not flat. The petals may be partially revolute with their arrangement appearing irregular.
  • Semi-Cactus – The ray florets are broad at the base, straight, incurved or recurved and the ray florets revolute for up to one half of their length.
  • Straight Cactus – The ray florets revolute for more that one half of their length; they also may be pointed, straight, or recurved, radiating in all directions from the center of the flower head.
  • Incurved Cactus – These dahlias also have ray florets that are curved for more than one half of the length but the pointed petals have a pronounced curvature toward the center of the flower head.
  • Laciniated – The split or laciniation should be in proportion to the ray floret length. There should be an overall twisting in the area of the split involute or revolute ray florets, to give an overall fringed effect.
  • Ball – fully double flowers, ball shaped or slightly flattened at the face, and the ray florets are blunt, rounded, or indented, involute for most of their length, fully involute for about one half their length, and normally displayed in a spiral arrangement.
  • Miniature Ball – Same form as ball dahlia , differing only in size.
  • Pompon – Fully double flowers similar to ball dahlias but more globular and smaller in size; also, the ray florets involute for their whole length and fully involute for more than half of their length.
  • Stellar – Fully double, breaking gradually from immature florets to fully developed outer florets. The outer florets should be narrow and involute with a slight recurve to the stem. The less mature florets should possess the same narrow and partially involute characteristic. The depth of the stellar dahlia type should be from one half to two thirds the diameter of the bloom, the greater depth being the ideal.
  • Waterlily – Fully double and symmetrical blooms with a side view that appears to be flat or saucer shaped. The ray florets are openly faced giving the bloom a delicate appearance. The center is closed and dome shaped breaking gradually to four to seven rows of fully developed outer ray florets which are also broad and slightly cupped.
  • Peony – An open centered dahlia with two or more rows of ray florets surrounding the disc flowers (small tubular florets which make up the central part of the flower. Each has a pistil and stamens but generally no other conspicuous flower parts). Ray florets adjacent to the disc flowers may be smaller, twisted, and/or curled.
  • Anemone – Dahlias with one or more rows of ray florets surrounding a center of elongated tubular disc florets. These disc florets should be fully developed and present a domed, pincushion appearance.
  • Collarette – An opened faced dahlia with a single row of uniform evenly spaced compound ray florets in a flat plane surrounding the disc flowers. The petaloids that surround the disc are less than one-half the length of the ray florets.
  • Single – An open faced dahlia with a single row of uniform evenly spaced ray florets in a flat plane surrounding the disc flowers.
  • Mignon Single – Same as single, differing only in size.
  • Orchid – An open centered dahlia with a single row of evenly spaced ray florets in a flat plane surrounding the disc flowers. The ray florets are involute for 2/3s or more of their length and fully involute for at least 1/3 of their length.
  • Novelty Open – Dahlias with characteristics differing from the present classifications. These dahlias will have a disc center.
  • Novelty Fully Double – Dahlias with characteristics differing from the present classifications. These varieties will have a fully double center.

Color

1) White

2) Yellow

3) Orange

4) Pink

5) Dark Pink

6) Red

7) Dark Red

8) Lavender

9) Purple

10) Light Blend – a blending of the lighter tints and tones of pink, yellow,lavender, and other pastels

11) Bronze

12) Flame

13) Dark Blend

14) Variegated – where two or more colors appear on the face of the bloom either in dots, splashes, stripes on narrow lines

15) Bicolor – blooms with two distinctly clear and sharply separated color

Time to Plant a Rainbow

I mentioned recently that the imminent annual rhizome sales by the Monterey Bay Iris Society. If you made notes, you know that the first of two sales happens today, at the Deer Park Center in Aptos. If you didn’t write a reminder to yourself, by the time you read this, you missed it.

Happily, the second sale is a week away, at August 11th at the Aptos Farmer’s Market, located at Cabrillo College. For details, visit http://www.montereybayiris.org.

These sales are very popular: the rhizomes are favorably priced and sell quickly. Their popularity begins with the plants themselves, which most gardeners find both easy to grow and stunningly beautiful. The extraordinary range of colors—and color combinations—that iris blossoms display have earned the plant’s name, which comes from the Greek word for the rainbow.

Iris hybridizers search diligently for new colors, color combinations, patterns and textures, at the same time striving to improve the species in terms of blossom size, number of blossoms, overall form, vigor, resistance to disease and other traits.

The hybridizing process, like that of all flowering plants, seeks to combine the desirable characteristics of two plants. For example, one might have blossoms with very beautiful colors while the other has attractively ruffled blossoms. The hybridizer transfers pollen from the anther of one plant (the pollen parent) to the stigmatic lip of the other plant (the seed parent), plants the resulting seeds and evaluates the progeny. It is up to the plants to produce new plants with a marketable combination of features.

The result of this continuing quest for improvement is an ever-expanding multitude of named varieties and the evolving opportunity for the iris fancier to add to his or her collection. Each year brings new introductions with unique names.

All the new hybrid plants do not combine the desired characteristics as the hybridizer intended. Each trial inevitably yields many new plants that do not improve upon their parents. The hybridizer does not offer such seedling as new named introductions, so we who buy irises for our gardens see only very attractive plants. The “duds” are discarded.

Most hybrid irises are descended from one of just three species in the genus Iris: the German Iris (I. germanica), the Sweet Iris (I. pallida) or the Hungarian Iris (I. variegata), all of which are categorized as “tall bearded” irises. The hybrids of these species number in the thousands—and counting—but the genus includes about 300 species. Gardeners who appreciate the unique form and stunning range of colors of the iris have ample opportunities to look beyond the popular hybrids and explore the long list of naturally occurring species.

More

Iris Cultivation
The websites of the American Iris Society and the Monterey Bay Iris Society provide detailed information on the cultivation of irises.

Mail Order Sources of Tall Bearded Irises (West Coast Growers)

Aitken’s Salmon Creek Garden, Vancouver, WA
www.flowerfantasy.net

Bay View Gardens
(our friend Joe Ghio)
1210 Bay Street, Santa Cruz, CA 95060

Cadd’s Beehive Iris Garden
(our friends Anna & David Cadd)
Healdsburg, CA
(707) 433–8633; caddiris@comcast.net

Fred Kerr’s Rainbow Acres
North Highlands, CA
www.rainbowacresonline.com

His Iris Garden
Merced, CA
www.hisirisgarden.com

Iris Fan, The
Albany, OR
www.theirisfan.com

Keith Keppel
P.O. Box 18154, Salem, OR 97305

Lauer’s Flowers
Independence, OR
lauersiris.com

Napa Country Iris Gardens
Napa, CA
www.napairis.com

Nola’s Iris Garden
San Jose, CA
(408) 929–6307; info@walking-p-bar.com

Pleasant Valley Iris Farm
Vacaville, CA
(707) 451–3367

Snowpeak Iris and Daylilies
Lebanon, OR
www.snowpeakiris.com

Scheiner’s Iris Gardens
Salem, OR
schreinersgardens.com

Superstition Iris Gardens
Cathy’s Valley, CA
community.webshots.com/user/rickt103

Sutton’s Iris Gardens
Porterville, CA
suttoniris.com

Wildwood Gardens
Molalla, OR
www.wildwoodgardens.net

Mail Order Sources of Species Irises
Note: Most growers carry at least a few species irises in addition to the ever-popular hybrid tall bearded irises (called TBDs). The growers listed below place greater emphasis on the many alternatives to the tall bearded irises.

Draycott Gardens (beardless irises)
Upperco, MD
www.draycott-gardens.com

Eartheart Gardens (Siberian & Japanese Irises)
Harpswell, ME
www.EartheartGardens.com

Ensata Gardens (Japanese Irises)
Galesburg, MI
www.ensata.com

Iris City Gardens (Siberian, Louisiana and other beardless species)
Primm Springs, TN
222.iriscitygardens.com

Iris Haven (Louisiana Iris)
Australia
www.irishaven.com.au

Wildwood Gardens
Molalla, OR
www.wildwoodgardens.net


Finding Rare Plants

More by chance than by intention, I discover plants that are fairly rare in residential gardens. Invariably, my discoveries are plants that are native to dry summer climate regions, because it is that population within which I seek plants for my own garden.

Incidentally, gardeners who search for plants from climates other than their own garden’s climate are called “zone deniers.” Gardening with plants from exotic zones might appeal to one’s sense of adventure but it involves more challenges than I would enjoy.

Here are three attractive rare plants that I have encountered recently

Blood Flower (Haemanthus albiflos).

Image from Wikipedia (http://en.wikipedia.org)

An evergreen South African bulbous geophyte, related to the Amaryllis. The generic name translates as “blood flower,” reflecting the red flowers of the first species found, H. sanguineus. The specific name of the plant I acquired from the Monterey Bay Area Cactus and Succulent Society means “white flower,” so I now have a white-flowered Blood Flower. The plant is sometimes called “Elephant’s Tongue” for its leaves or “Shaving-brush Plant” for its unusual flowers. This is a very low-growing plant, suitable as a rock garden specimen or indoor plant.

Source (among others): Telos Rare Bulbs <http://telosrarebulbs.com>

Blue Chilean Crocus (Tecophilaea cyanocrocus).

Image from The Scottish Rock Garden Club (http://www.srgc.org.uk)

A very rare geophyte that is native to Chile, but presumed extinct in the wild since 1986. Plant hunters rediscovered it in 2001 and brought back corms. It has been propagated in botanical gardens and is slowly becoming available commercially. The plant, a member of the iris family, has blossoms that resemble those of the Crocus, a different member of that same family. Its flowering stems grow up to four inches tall, and the deep gentian clue flowers, with a whitish center, are just one inch across. In the northern hemisphere, it blooms February to March.

Source (among others): Brent and Becky’s Bulbs (https://store.brentandbeckysbulbs.com)

Golden Fuchsia (Deppea Splendens).

Image from http://www.strangewonderfulthings.com

Another plant that probably is extinct in the native cloud forests of southern Mexico (Chiapas) and Guatemala. This plant flowers in late summer with spectacular clusters of pendulant golden yellow tubular flowers topped by violet-red calyces. Even its leaves are attractive. The plant is not a Fuchsia, but a member of the very large coffee family. One of its many relatives is the Gardenia. Its seeds were first brought to northern California in 1981 and distributed selectively. Most of the plants grown from these seeds were killed by frost, but a few plants survived in the San Francisco Botanical Garden and the Huntington Gardens, and are now slowly becoming available commercially.

Source (among others): Annie’s Annuals & Perennials (https://www.anniesannuals.com/)

Avid gardeners could select these or countless other uncommon plants to enjoy for their beauty and rarity. Not all rare plants are attractive or even garden-worthy, so plants that meet those criteria and will also flourish in our dry summer climate are welcome treasures.

Enjoy your own rare plant discoveries.